DIY Liam Barn Light Bed
This post is a bit overdue as I knew it was going to be a long one. A while back, I posted my ideas for The Kid’s room including the bed I wanted to build. I was pretty sure I could build it for considerably less than the $2000 price tag of the original. I was debating on whether to make the bed frame a storage bed (shown below) or just plain, like the original.
Brookstone Storage Bed via Ana-White.com
The final decision was to keep it plain so the headboard would be the focal point and the bed wouldn’t be too “heavy” in the space. And that was also the cheaper and easier choice 😉 I also posted about the Ikea dressers and nightstand I painted to match the to-be-built bed and the Patent artwork I made for his walls.
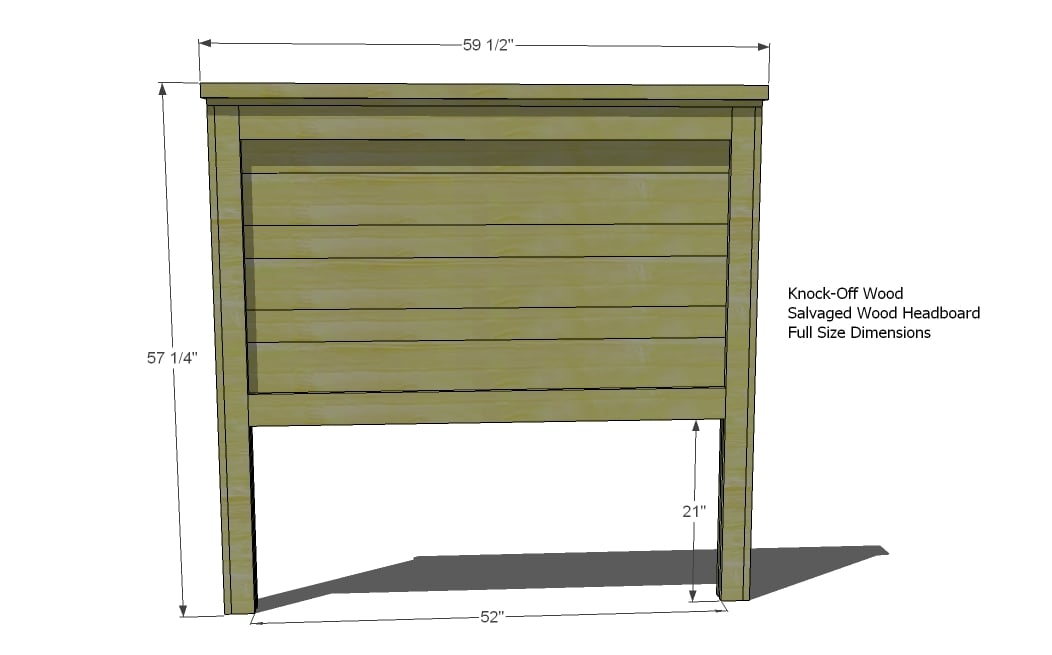
Eventually, we finally purchased the lumber for the bed itself. I had already done a bunch of research and found a couple plans I could modify to make the Barn Light Bed. For the headboard, I would modify Ana White’s Reclaimed Wood Headboard and for the frame I would build a full size version of the Farmhouse bed, just like the king size version I built for my parents.

The headboard would need to be modified so that it was taller (the inspiration headboard is 72″ tall). I also wanted to use equal sized panel pieces for the middle instead of a mix of 4″ and 6″. Obviously, it would also be made to fit the light and switch.

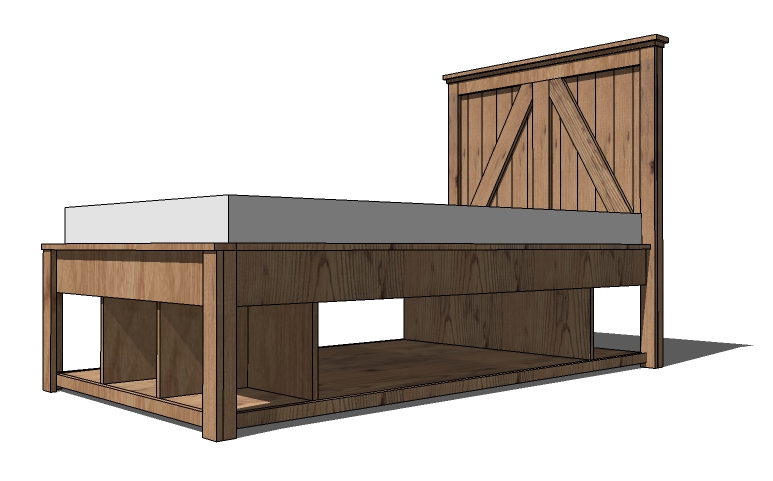
The bed frame would remain like the original plans for the Fancy Farmhouse Bed.
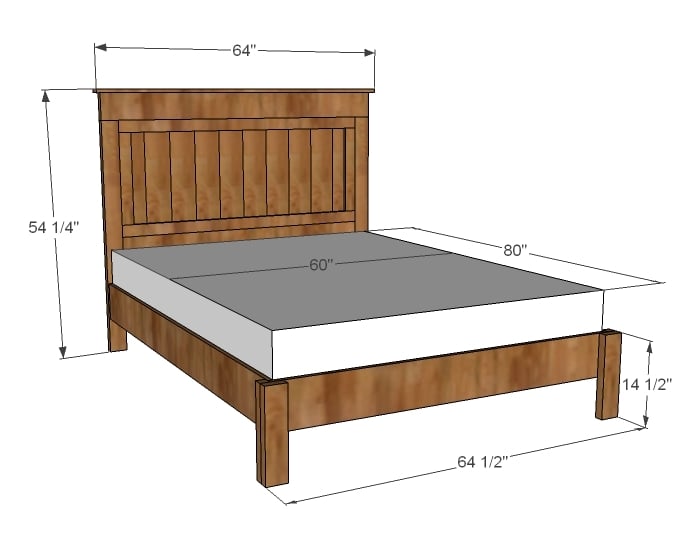
Fancy Farmhouse Bed
*Please see my cut and part lists at the bottom of this post along with links to Ana White‘s instructions for the above plans. For Twin Size, see THIS POST.*
First, we built the bed frame to get the large pieces out of the way. Just like framing a wall – 5 joists between 2 side boards, all screwed together. . .

Next, we lifted it onto the bed of our truck so we had access to the sides. We attached the foot rail and 2 side rails with screws (and glue) from the inside with the top of the rails approximately 2″ above the joists.

Next came the legs with a 2×4 along the footboard and a 2×2 along the side, screwed from the inside and all glued together.

It doesn’t sit on the floor very well without a headboard attached 🙂

Here are close ups of how the legs are attached.

I then sanded everything down and filled the gaps with wood putty, then sanded again to make it all look like one piece.


We ended up adding two 2x4s to the headboard end for extra support so it would have more holding it up than just being screwed into the headboard legs. They are not visible unless you lay on the floor.

With the frame done, we moved on to the headboard. Unfortunately, I didn’t take any “in progress” pictures of the headboard. Once we get started, it’s easy to forget to stop to snap some pictures! The only changes from the original plans are that it is 72″ tall and we used 6″ tongue and groove panel boards for the middle section instead of a 1×4 and 1×6 boards. The tongue and groove panel boards are actually beadboard on one side, but we used the back side which is plain. Having the beadboard visible would be a neat option to try though – especially for a girl’s room.
We built the bed frame and headboard in a short afternoon. It went together quick. The next morning I sanded, puttied and sanded some more.

Then came paint. I used the same oil based paint in Behr Cracked Pepper (PPU260-1) that I used on the Ikea dressers for his room. Being oil-based, it took 24 hours between coats and I applied 2-3 so it took several days.


I purchased the Portfolio Ellicott 10″ Galvanized Light from Lowe’s and David picked up a power cord, 2 electrical boxes, dimmer switch and cover. The light also comes in a 13″ size, but I thought that would be too big on a full size bed. On a queen or king, I would consider putting 2 lights. David cut 2 holes in the headboard (as I held my breath!). A round one centered in the middle towards the top and a rectangle on the right side about half way down. We made sure the switch would be high enough to clear the mattress and pillows.

He installed the electrical boxes. This picture (below) shows the back and you can see the headboard side of the panels. (I only put one coat of paint on the back.)

Using the power cord he bought, he wired the bare end to the light, then used clips to secure the wire along the trim. He then attached the wire to the switch, making the appropriate connections there.
*I should note that he is extremely experienced with electricity so this was an easy project for him. I would not suggest anyone attempt this without a strong knowledge in electrical wiring.*

The end of the power cord comes out of the switch box and hangs down to be plugged into the wall. Below is the view of the front with the switch installed and the wire ready for the light installation.

We carried it upstairs and attached the headboard to the frame using screws from the backside of the headboard. I still need to touch up paint where it got marred moving it around, but I love the way it turned out!
Original Full Size Bed = $2000
My DIY Version = ~$350


For safety reasons, the light bulb in the headboard (and nightstand lamp) are LED bulbs so they don’t get as hot as incandescent bulbs.

A close up of the finished legs and frame . . .


I was originally going to use a more industrial style switch, but I thought a dimmer would be nice so he can adjust how bright it is.


Here are the details (see my previous posts on this room HERE):
Wall Color: Behr Burnished Metal (discontinued Premium Plus Ultra color – UL260-17)
Trim & Ceiling: Behr Silky White (PPU7-12)
Furniture Color: Behr Oil Base Semi-Gloss Enamel in Cracked Pepper (PPU260-1)
Dressers & Nightstand: Ikea Hemnes with custom drawer pulls
Bedding: Landon Quilt and Bulldog Pillow from Pottery Barn Kids, Plaid Sheets – Circo from Target
Artwork: DIY Patent Artwork Using Silhouette Sketch
Mario Lamp: Custom Made by David
Barn Light Headboard – Full Size
DIMENSIONS
Headboard Only – 59 1/2″ W x 72″ T x 3 1/2″ D
Headboard & Frame – 59 1/2″ W x 72″ T x 80″ D
MATERIAL LIST
2 – 1×2 @ 6′
7 – 1×3 @ 6′
6 – 1×4 @ 6′ or 3 @ 10′
8 – 1×6 @ 6′ or 4 @ 10′ *
1 – 2×4 @ 6′ or stud length
* – We used 1×6 Tongue and Groove Beadboard Panel Boards with the non-beadboard side visible.
Barn Light Sconce (or light of your choice) – We recommend a LED bulb for reduced heat output
Lamp Power Cord
4″ Light Fixture Box
1-Gang Switch/Outlet Box
Light Switch (we used a dimmer switch) and Switch Cover Plate
Wire Clips
1 1/4″ Screws
2″ Screws
Finish Nails
1 1/4″ Pocket Hole Screws
2 1/2″ Pocket Hole Screws
Wood Glue
Finish Supplies (Wood Filler, Paint, etc)
CUT LIST
6 – 1×3 @ 70″ (Front and Backs of Legs)
2 – 1×2 @ 70″ (Inside of Legs)
2 – 1×4 @ 54″ (Top and Bottom Panel Pieces)
8 – 1×6 @ 54″ (Panel Pieces)
4 – 1×4 @ 52″ (Panel Trim, Front and Back)
1 – 1×3 @ 58 1/2″ (Top Trim)
1 – 2×4 @ 59 1/2″ (Top of Headboard)
Assemble the above cut boards using the Reclaimed-Wood Headboard instructions on Ana-White.com. Finish by cutting appropriate holes for the light and switch boxes. Have an experienced electrician wire the light, switch and power cord.
Bed Frame – Full Size
DIMENSIONS
Frame Only – 58 1/2″ W x 14 1/2″ T x 77 1/4″ D
MATERIAL LIST
4 – 2×4 @ 10′
1 – 2×4 @ 5′
2 – 1×8 @ 8′
1 – 1×8 @ 6′
1 – 2×2 @ 30″
2 1/2″ Wood Screws
3″ Wood Screws
1 1/4″ Finish Nails
Wood Glue
Finish Supplies (Wood Filler, Paint, etc)
CUT LIST
5 – 2×4 @ 51″ (Joists)
2 – 2×4 @ 75″ (Sides of Bed Frame)
2 – 1×8 @ 75″ (Siderails)
1 – 1×8 @ 55 1/2″ (Footrail)
2 – 2×2 @ 14 1/2″ (Legs)
2 – 2×4 @ 14 1/2″ (Legs)
Assemble the above cut boards using the Fancy Farmhouse Bed instructions on Ana-White.com. Start with Step 7 for the bed frame only. Attach Headboard to Frame using screws from the back of the Headboard. We also used 2 scrap 2x4s for extra support at the top of the bed frame (as shown above). Use plywood or MDF to support mattress without box springs. We used a Sleep Number mattress without the base frame. Instead of plywood on the bed frame, we used the top of the Sleep Number base which is just 4 large plastic panels.
This bed is so beautiful and you have inspired me to make my daughters new big girl bed from this post! I was downloading Ana White’s bed plans then found your modifications.. I love the height of the head board and the light! You are true inspiration, great job!
Thanks so much! Good luck with your project.