DIY Overload – UPDATED
*UPDATED 4/9/2013 to add pictures of the Farmhouse Bed complete with it’s mattress and bedding.*
I’ve spent the past couple weeks working in the garage on several projects. My parents needed a bed for their room at my sister’s new house and my sister needed a new bed too. She also has a ton of DVDs, so I wanted to make some closet dvd storage for her. My dad originally made one of these along time ago and we remembered it at our old house when we were trying to figure out where to store our movies. They are pretty easy to make (I made 2 in a couple hours last week) and are a great alternative to having furniture or closet space taken up by DVDs. (You could also use them for CDs). They hang on the inside of a closet door so they are out of sight. Below are the materials and cuts I used to build them.
Dimensions: 19.5″ Wide x 61.5″ Tall
Materials:
3 – 1×6 @ 8′
3- 1/4″ Square Dowl @ 3′
2 – Over the Door Hooks (This or something similar)
1.5-2″ Wood Screws
Wood Glue
Cut List:
8 – 1×6 @ 18″
2 – 1×6 @ 61.5″
8 – 1/4″ Square Dowels @ 18″
I glued and screwed 2 of the 18″ boards together for the top for added strength. Then I used screws and glue to attach the shelves to the side boards. The shelves are evenly spaced, approximately 9.25″ apart. (For CDs, you could add more shelves closer together.) Once assembled, I glued the square dowels flush to the front edge of the shelves to keep the DVDs from falling off the front. I then drilled 2 holes thru the top boards for the hooks to go thru. For the one at our old house, we painted it with our trim paint so it would match the closet door it hung on.

Here is ours hanging inside our office closet door. It’s important to make sure your door is big enough to hold it and you have room inside the closet to still close the door (for example, this usually doesn’t hang on this door because there isn’t room to close the door – I just moved it for the picture.) My sister’s doors have levers on the inside, so it has to hang closer to the hinge. Another option is to secure it straight to the door if you have solid wood doors and don’t mind the holes.

Here is a close up of the shelves. Each rack cost around $35 to build and took less than 2 hours plus finishing time.

Next, I started working on my parents’ new bed. I built this plan, which is very similar to a bed mom had been wanting. It’s the largest and “fanciest” project I’ve done so far, but it went together fairly easily. The original plans were for a queen size so I had to modify it to make a king. That mainly involved adding 16″ to all the width measurements. I also used 1×8 boards for the headboard panels instead of 1x6s.

It is painted with Satin White Latex Enamel.

The hardest part of the whole project ended up being getting it into my sister’s house. The legs made the platform about 1/4″ too large for the doorway. It was really frustrating because it was so close. We were about to take one of the legs off which would have been a disaster since they are glued, screwed and painted on, but we finally found the perfect angle to get it thru the doorway. I had to touch up the paint in a few spots, but that was much better than having to remove and replace one of the legs.

We still need to get plywood for the mattress to sit on and I’m going to add a middle leg between the 2x4s for extra support since it is a king size.

UPDATED 4/9/2013 – Here are pictures of it as it is now.


After we got that one out of the garage, I started work on my sisters bed. It is a lot less complicated and was already written for a queen size, so I didn’t have to do any modifications. The only change I did make was to use 1x6s for the legs instead of 1x3s so it would sit higher off the floor (her cats like to sleep under her bed). The original plans are Here and Here.

I painted it with RustOleum Painter’s Touch Metallic in Oil Rubbed Bronze. I really like how it looks. The wood grain shows thru some which gives it the illusion of stain. It also has a slight metallic sheen in the right light, but it’s subtle. The only downside is that the metallic flakes give it a rough texture. I contemplated putting a couple coats of poly on it, but decided to wait. Luckily, getting this one in the house wasn’t a problem ;P

She doesn’t have a queen size mattress yet, so this was taken with her full size on it. I’ll try to get better pictures with my real camera once she gets her new mattress.
Meanwhile, we saw our builder this weekend at the Parade of Homes. Their son’s house was on the parade so we stopped by to check it out. It had a lot of similarities to what I want (kitchen, trim, etc) which was nice to see. It got me really excited again about getting started. We were there for over an hour and had a good time talking and getting more information We still hadn’t seen anything from the draftsman (it’s been 7 weeks), so the builder called him on Tuesday and I sent him an email on Wednesday. We got an email from the draftsman yesterday morning which had the basic floor plan drawn. He is working on the elevations and roof now so hopefully we will see them soon. Very excited about finally seeing how the outside is going to really look. Hopefully I’ll have another post on that soon!
Hi There! I have a question…I really want to build that fancy farmhouse bed, it’s so beautiful! Is it possible for you to explain to me how I can build this with using the metal bed rails and box springs that I already own? I’m also confused as to how the footboard legs are constructed and attached. If you could help me, I would so appreciate it!!! Thank you!!
Are you wanting to build the bed without the platform? Since there really isn’t a footboard to this version, the easiest thing would be to just make the headboard which could easily be screwed to existing metal bed rails (they usually have holes for attaching a headboard). I believe there is another version on ana-white.com that has a footboard which could also probably be built separately and attached to metal rails. If you are wanting to keep the look of the bed I made, personally, I’d just forget about the box spring and metal rails and build it as is. We’ve done that with a couple of our beds and now no longer have any box springs in our house and we don’t miss them. Our parents who have all visited also prefer not having the box spring. Just my .02.
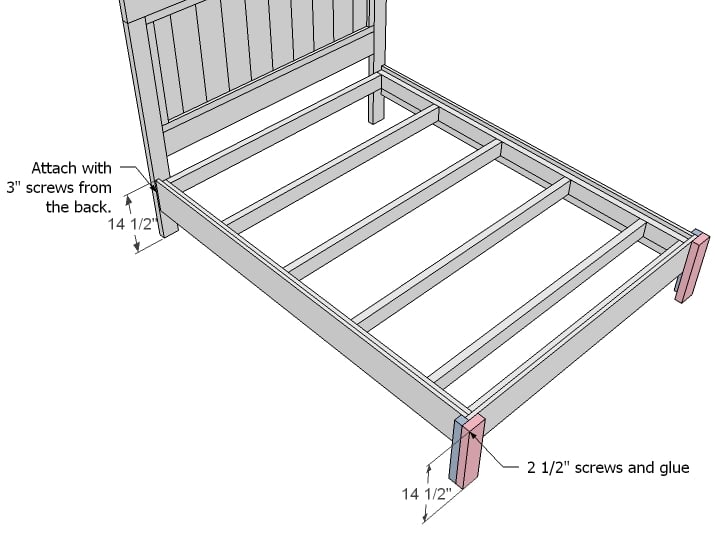
This picture best shows how the legs are attached. The 2×4 attaches to the front, overhanging the side. The 2×2 goes behind it along the side so they are flush. Hard to explain, but the picture shows it pretty well. I believe we screwed them on from the inside along with gluing them.
Thanks so much for getting back to me! I think I’m going to take your advice and just build it as is and get rid of the box springs and rails. This is my first real project after the ten dollar ledges….fingers crossed!
Hi!
LOVE this bed! We’re getting ready to build a king version of it ourselves.
I have a few quick questions if you have a minute…
1- Did you put your mattress right on top of the 2×4 frame, or did you put down a piece of plywood first? I’ve ready that the slats should have 3 inch spacing, and that plywood can lead to moisture issues on the underside of the mattress.
2- The new king plans call for 1×3 and 1×4 legs at the foot. Did you do the original 2×4 and 2×2’s called for in the queen plan? The king plan also calls for extra legs in the middle. Have you had any problems without them?
3- Lastly! I like where your pillows are hitting the headboard. Do you know about where the mattress hits the headboard? We’re buying a new kind mattress and its 14 inches thick, so we’re trying to figure what we want for the final height of everything.
Thank you so much- your parents must be so thrilled!
Sorry it’s taken me a while to reply. Hope this helps:
– We put plywood or particleboard on top of the 2×4 frame seen in the garage picture above. The guest bed I made for our house just has a plywood platform and we’ve never had a problem with moisture despite living in a Southern humid climate. Granted, we do have air conditioning and it runs most of the time. If I were to do build it again, I would probably make slats like I did with this plan.
-Ana White posted the king plans for this bed several months after I made this one. I used the original queen plans, but changed the dimensions for a king. So, yes, I used the original 2×4 and 2x2s for the legs. My dad ended up adding an additional leg using an extra 2×4 scrap to the middle of the frame. I’m not sure it needed it, but he figured it was worth adding before they put the mattress on. It obviously couldn’t hurt.
-I’m not sure exactly where the mattress hits the frame. They didn’t have that mattress yet when I made the bed. I think I estimated where to put it using the thickness of our own mattress. The instructions say to put the frame 1″ down from the top. It looks like I did that or 2″. Their mattress is probably around 14″ thick.
I’m a relative rookie with just a few builds under my belt, but I’d like to tackle this bed for my son’s upcoming wedding. My concern is when viewing the build plans it looks so very close to the ground. Is it just an illusion the photographs create? I’ve gone around our house analyzing our beds and they *seem* to be off the ground more. We utilize it for storage not to mention an Aussie pup that likes to burrow underneath to sleep:)
Do you have any idea of the distance from the floor to side rails and how difficult it would be to modify if desired? Any assistance would sure be appreciated!
I built this bed and made it about 1 inch higher from the ground than the plan states. When we set the bed up in our room I was shocked with how low it seemed but as soon as we put the mattress down it looked very high! I am so happy with the height and how it turned out and glad I didn’t modify it too much. It’s a little bit deceptive looking because the side rails make it look lower than it really is. Granted, we do have a thick, pillow top mattress, so if your mattress is not really thick than try adding about 2-3 inches if you’re worried about the height. Just a suggestion!
I’m not sure which bed you are asking about. I’m pretty sure I built the Farmhouse Bed at the original height specified on the plans. That shows the height of the legs being 14.5″ from the floor the the top of the side rails. That would leave around 7″ below the side rails. Our store-bought master bed is about that height and our Bulldog somehow manages to squeeze himself under there. Making it taller should be fairly easy. Just add the same number of inches to the 4 leg pieces as well as the 2 headboard legs.
I did modify the second bed (chunky leg frame bed with cutout headboard) to make it higher. As mentioned above, I used 1x6s for the legs instead of 1x3s. It’s still pretty close to the ground though, but her cats can get under it. It could be made taller, but you’d have to consider the headboard and making sure it was tall enough as well.
Oops! Sorry for not being clearer. I was inquiring about the farmhouse bed. Thank you for your quick response. I just measured our store bought beds around the house and they are 12″ from floor to frame…so no wonder it seemed low. I take courage from your “fairly easy” comment. I’ll attempt to modify. Fingers crossed!:-)